iOS Tips
工具类
提取assets.car中的图片
ThemeEngine:Mac下的Assets.car文件查看工具,能够将图片导入到PhotoShop中进行编辑,提供了导出图片的功能。ThemeEngine拥有命令行版和图形界面版。使用私有APICoreUI开发。 下载地址:https://github.com/alexzielenski/ThemeEngine
cartool:Mac下的命令行小工具,能够将Assets.car文件解包到指定文件夹。目标文件夹需要事先创建好。该工具使用私有API中的CoreUI进行开发。 下载地址:https://github.com/steventroughtonsmith/cartool
1 | ./cartool Assets.car outputDir |
acextract:Mac下的命令行工具,Swift版。 下载地址:https://github.com/bartoszj/acextract
[iPhone 6 屏幕揭秘](iPhone 6屏幕揭秘.pdf)
iOS 通过获取iTunes上的APP信息,判断是否提醒升级APP
1 | POST https://itunes.apple.com/CN/lookup?id=978591579 |
使用POST方法,id 是iTunes connect里APP信息的Apple ID:为APP自动生成的id
Charles 请求 HTTPS 出现 “You may need to configure your browser or application to trust the Charles Root Certificate. See SSL Proxying in the Help menu”
首先确认是否安装了 Charles 的证书,该证书在菜单 Help -> SSL Proxying 下,需要同时安装在 Mac 和 模拟器或者设备上,具体使用方法参见子菜单。其次因为 10.3 以上系统需要你在“证书信任设置”中信任 Charles 的证书。在设备上点击设置 -> 通用 -> 关于本机 -> 证书信任设置 -> 选择 Charles 的证书打开。
通过 Apple Configurator 下载 ipa 包
- 安装Apple Configurator
- 打开Apple Configurator,连接 iOS 设备
- 点击导航栏的添加按钮选择 Apps,然后点选你需要的app,点击添加后,将会开始下载。
- 下载完成后,先别点击任何选项!打开Finder,然后进入这个路径
~/Library/Group Containers/K36BKF7T3D.group.com.apple.configurator/Library/Caches/Assets/TemporaryItems/MobileApps/就可以看到你刚下载的 ipa 包。这个是临时文件,你关闭 Apple Configurator 或者点选后会自动消失的。
Xcode
iOS开发证书显示“此证书的签发者无效”解决方法
原因:Apple Worldwide Developer Relations Certification Authority Intermediate Certificate 证书过期。
解决办法:
- 在『钥匙串访问』的菜单项中选择显示已过期证书,删除已过期证书。
- 在Apple PKI网页下载最新的证书:https://developer.apple.com/certificationauthority/AppleWWDRCA.cer ,双击导入即可。
Xcode常见报错锦囊
Xcode只显示iOS Simulator的identifier,没有显示device version
当安装多个版本的Xcode时,有可能会在某个Xcode中出现相同机型相同版本的多个模拟器
解决办法:
- 退出Xcode.app, iOS Simulator.app等
- 执行命令关闭模拟器服务:
sudo killall -9 com.apple.CoreSimulator.CoreSimulatorService - 执行命令删除所有已经存在的模拟器:
rm -rf ~/Library/Developer/CoreSimulator/Devices - 重启Xcode,就可以看到在
~/Library/Developer/CoreSimulator/Devices目录,新生成的模拟器设备。 - 这样就不会有重复的模拟器设备了。
如何删除Xcode Downloads中的Components
解决办法:
- 退出Xcode.app, iOS Simulator.app等
cd /Library/Developer/CoreSimulator/Profiles/Runtimes,如果已下载,可以在该目录中找到simruntime文件- 删除对应模拟器版本
- 清空目录:
rm -rf ~/Library/Developer/CoreSimulator/Devices - 重启Xcode,让Xcode重新生成模拟器设备.
完全卸载 Xcode
终端输入以下命令:sudo /Developer/Library/uninstall-devtools —mode=all
Xcode 6.x的Scheme选项在 OS X El Capitan(10.11)中消失
解决办法:将Xcode的窗口拉长或者全屏就会出现
Xcode 7.1 无法安装Alcatraz插件
- 关闭Xcode
- 移除之前安装的Xcode默认项
1 | defaults delete com.apple.dt.Xcode DVTPlugInManagerNonApplePlugIns-Xcode-7.0 |
- 卸载Alcatraz
1 | rm -rf ~/Library/Application\ Support/Developer/Shared/Xcode/Plug-ins/Alcatraz.xcplugin |
- 移除所有通过Alcatraz安装的包
1 | rm -rf ~/Library/Application\ Support/Alcatraz/ |
- 更新已安装插件的DVTPlugInCompatibilityUUID到7.1
1 | find ~/Library/Application\ Support/Developer/Shared/Xcode/Plug-ins -name Info.plist -maxdepth 3 | xargs -I{} defaults write {} DVTPlugInCompatibilityUUIDs -array-add `defaults read /Applications/Xcode.app/Contents/Info DVTPlugInCompatibilityUUID` |
- 重置Xcode Select
sudo xcode-select --reset - 打开Xcode
- 安装 Alcatraz
1 | curl -fsSL https://raw.github.com/supermarin/Alcatraz/master/Scripts/install.sh | sh |
- 重启Xcode
- 选择”Load Bundles”启动Xcode
Xcode 安装编译后的.app文件
安装之前需要启动iOS模拟器。
1 | $ [Xcode安装路径]/Contents/Developer/usr/bin/simctl install booted [要安装的APP路径] |
示例命令:
1 | $ /Applications/Xcode.app/Contents/Developer/usr/bin/simctl install booted ~/Desktop/Examine.app |
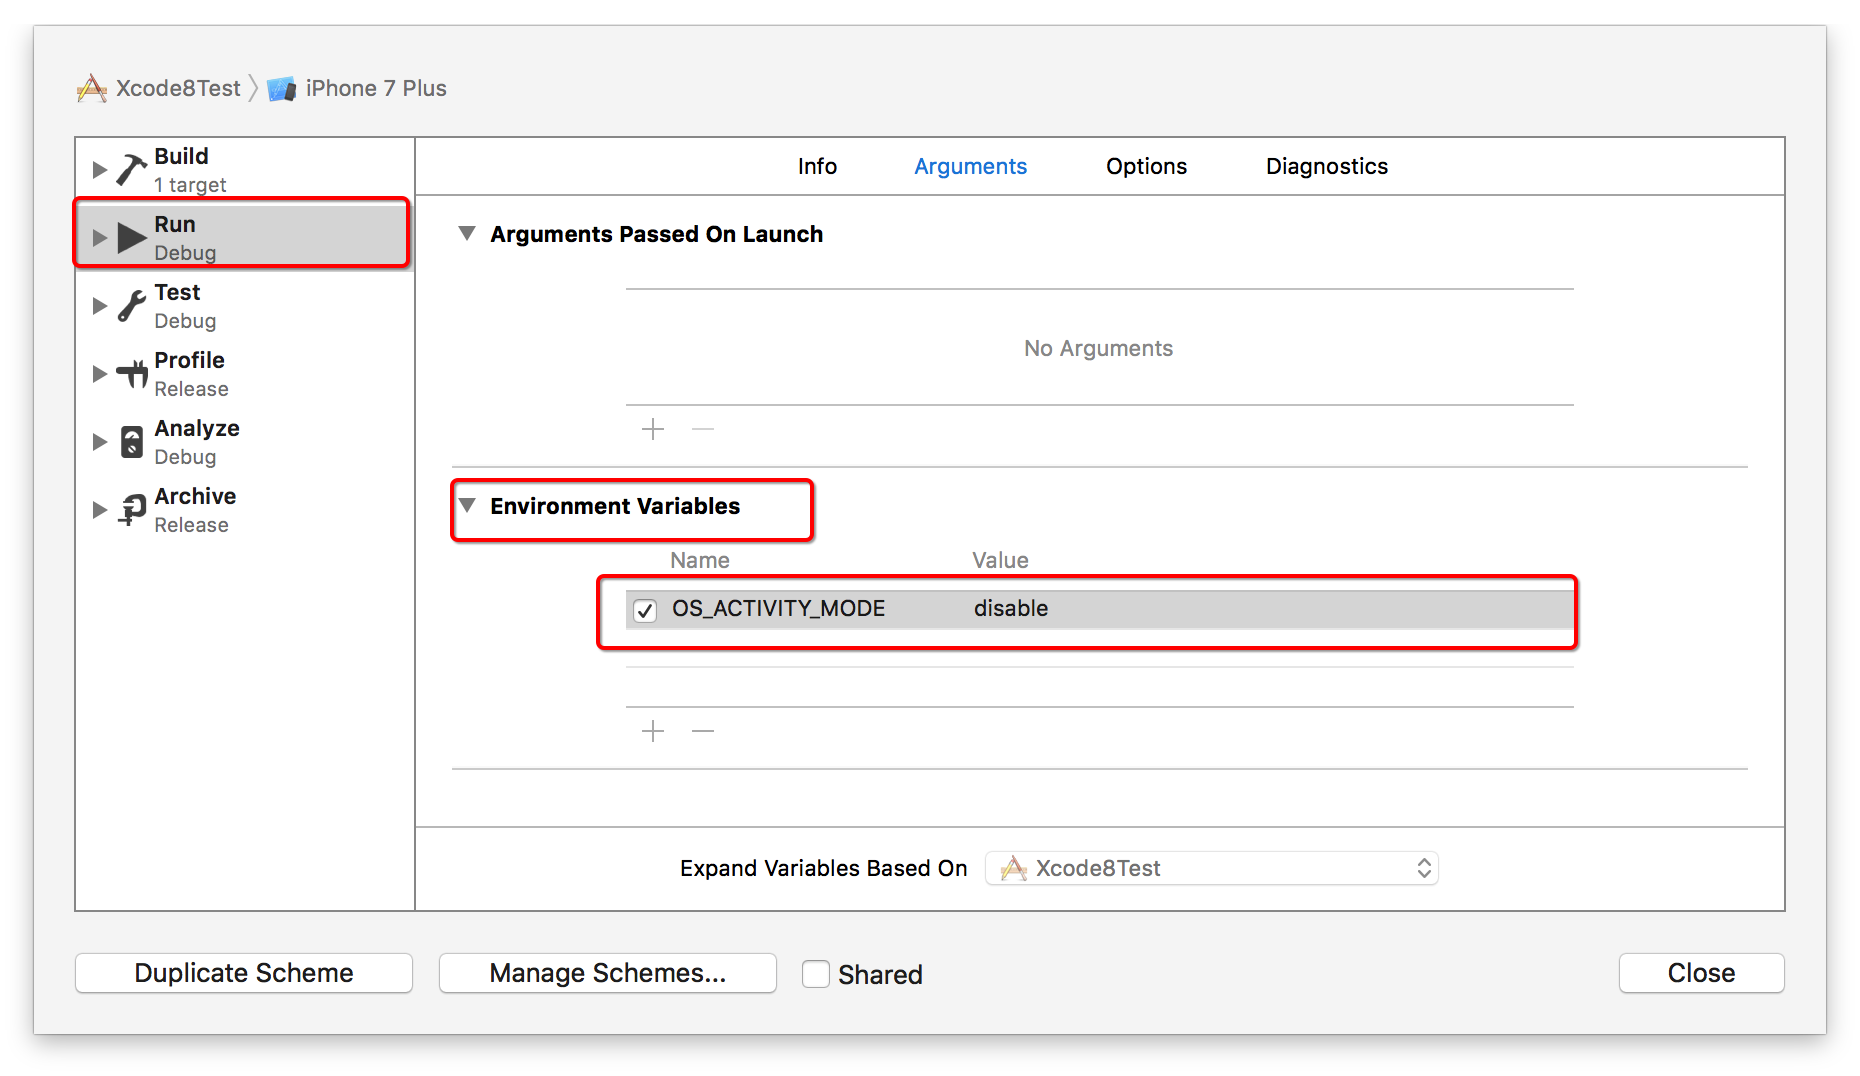
关闭 Xcode 8 终端打印一大堆日志
终端中打印的日志格式类似如下:
1 | subsystem: com.apple.UIKit, category: HIDEventFiltered, enable_level: 0, persist_level: 0, default_ttl: 0, info_ttl: 0, debug_ttl: 0, generate_symptoms: 0, enable_oversize: 1, privacy_setting: 2, enable_private_data: 0 |
解决办法:Edit Scheme -> Run -> Arguments,在Environment Variables里边添加OS_ACTIVITY_MODE = Disable

Xcode 7.x 中使用 Xcode 8 的新字体 SF Mono
从安装有 Xcode 8 的路径 /Application/Xcode.app/Contents/SharedFrameworks/DVTKit.framework/Versions/A/Resources/Fonts 下能找到这些字体。
选中所有字体拖拽到 Font Book.app(字体册)中,这样在 Xcode 7 中就可以选择了。
我自己将字体压缩了下,可以从这个地址下载: SF Mono 字体
Xcode Tips Tricks
https://www.hackingwithswift.com/articles/229/24-quick-xcode-tips
Xcode Snippets
关于 Xcode Snippets 的介绍,可以通过这篇文章了解,以及如何生成自定义的代码片段。
安装 NShipster 提供的代码片段
仓库地址:https://github.com/Xcode-Snippets
- 安装命令行工具:
gem install xcodesnippet - 下载代码仓库:
git clone https://github.com/Xcode-Snippets/Objective-C.git - 进入该目录添加单条代码片段:
xcodesnippet install path/to/source.m - 该目录下有很多代码片段,可以通过命令批量添加:
ls -1 | xargs -L1 xcodesnippet install
安装唐巧提供的代码片段
仓库地址:https://github.com/tangqiaoboy/xcode_tool
- 下载项目仓库:
git clone https://github.com/tangqiaoboy/xcode_tool cd xcode_tool./setup_snippets.sh
需要注意的是唐巧提供的代码片段,以后需要更新时可以直接仓库即可。
Understanding and Analyzing Application Crash Reports
详情链接:https://developer.apple.com/library/content/technotes/tn2151/_index.html
Foundation
获取程序沙盒Document目录
1 | NSArray *paths = NSSearchPathForDictionariesInDomains(NSDocumentDirectory, NSUserDomainMask, YES); |
Objective-C 关键字
消息传递
队列组
1 | // 1.创建队列组 |
Swift 命令行程序接收用户输入
1 | Swift 2.3 |
1 | // Swift 3.0 |
获取变量内存地址
unsafeAddressOf(_:)
返回类对象的指针,类型为UnsafePointer
函数原型
func unsafeAddressOf(_ object: AnyObject) -> UnsafePointer
示例代码
1 | var str = "Hello, playground" |
func withUnsafePointer<T, Result>(_: inout T, _: @noescape (UnsafePointer
Invokes body with an UnsafePointer to arg and returns the result. Useful for calling Objective-C APIs that take “in/out” parameters (and default-constructible “out” parameters) by pointer.
函数原型
func withUnsafePointer<T, Result>(_ arg: inout T, _ body: @noescape (UnsafePointer) throws -> Result) rethrows -> Result
示例代码
1 | struct Point { |
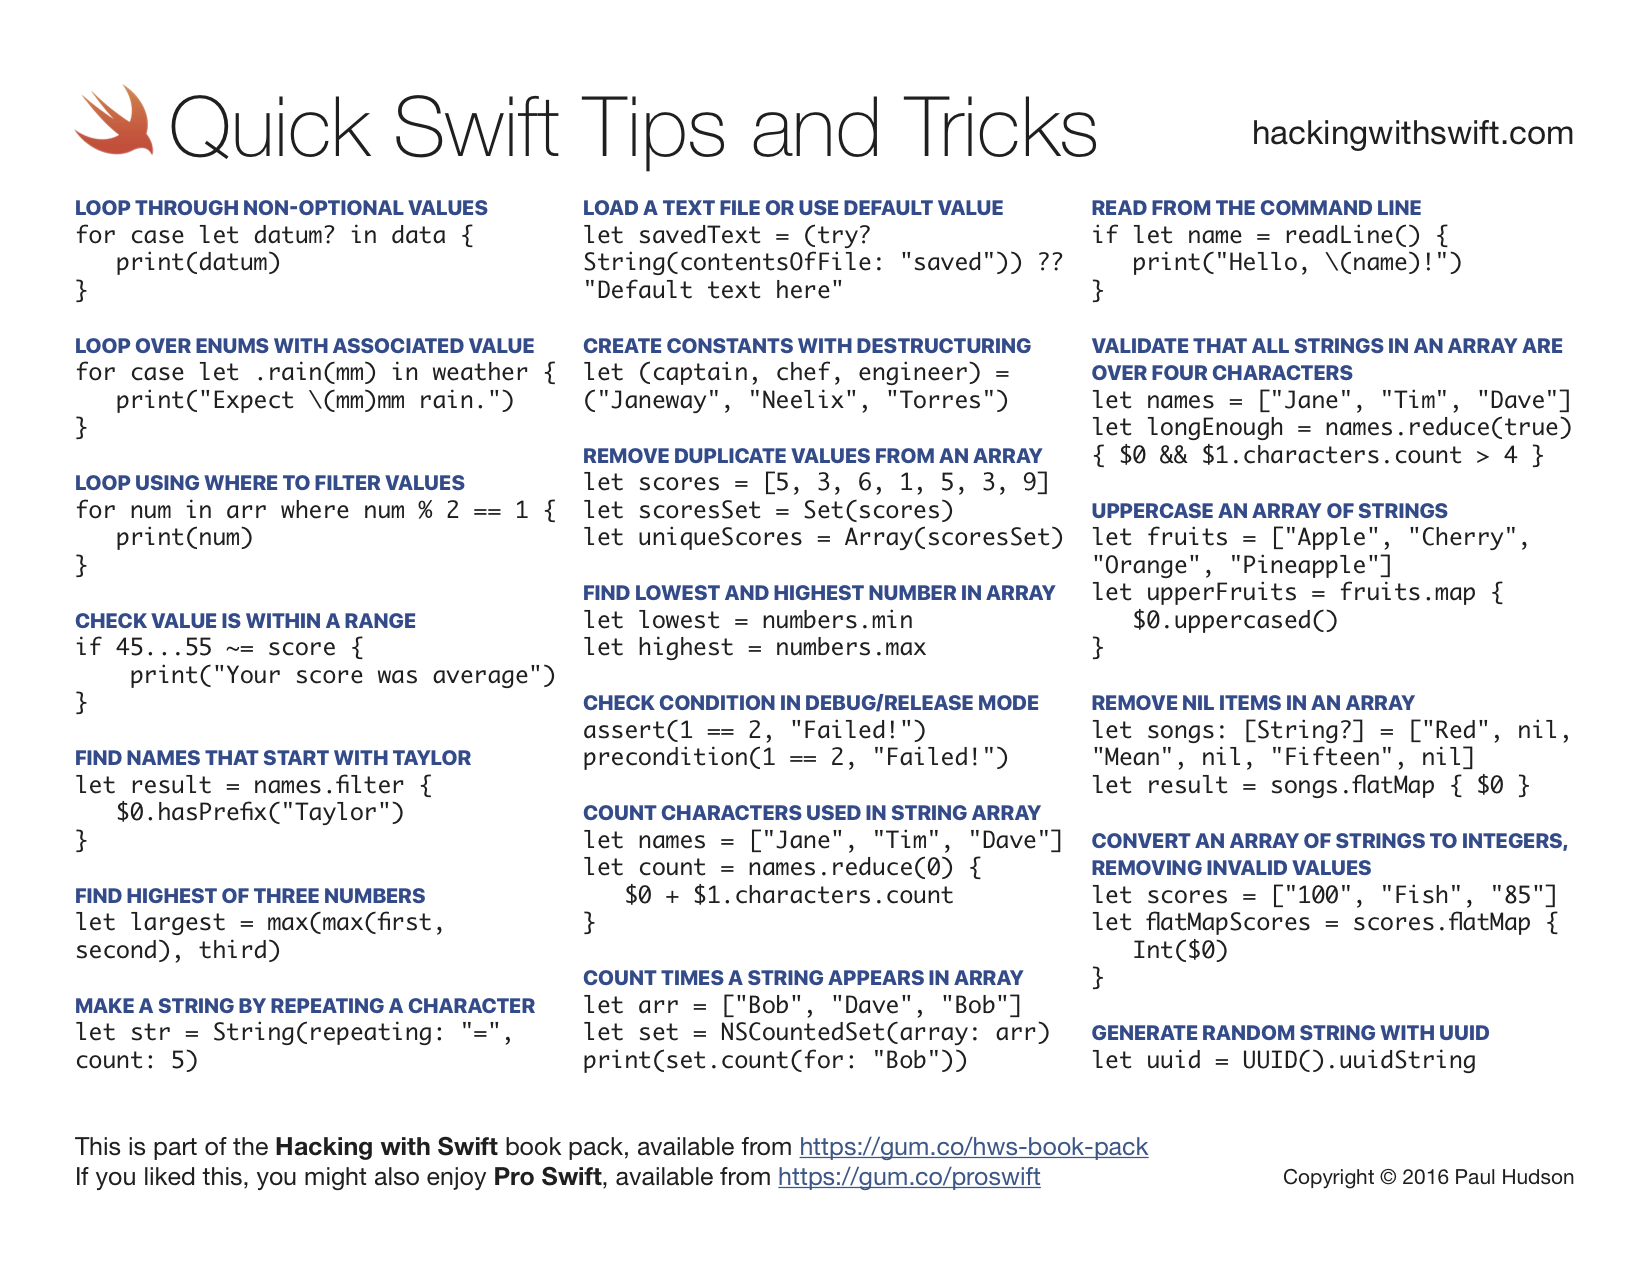
Quick Swift Tips and Tricks
UI
UITableView
取消cell的分割线
1 | tableview.separatorStyle = UITableViewCellSeparatorStyleNone; |
UITabelViewCell 的高亮状态的取消
1 | -(void)tableView:(UITableView *)tableView willDisplayCell:(UITableViewCell *)cell forRowAtIndexPath:(NSIndexPath *)indexPath{ |
设置分割线的左右偏移量
1 | tableView.separatorInset = UIEdgeInsetsMake(0, 100, 0, 0); |
TableView不显示没内容的Cell
1 | self.tableView.tableFooterView = [[UIView alloc] init]; |
或者
1 | tableView.separatorColor = [UIColor clearColor]; |
更改tableviewcell的小对勾的颜色
1 | tableView.tintColor = [UIColor redColor]; |
UITableView 在页面加载完成后滚动到底部
方法原型:- (void)selectRowAtIndexPath:(NSIndexPath *)indexPath animated:(BOOL)animated scrollPosition:(UITableViewScrollPosition)scrollPosition
1 | - (void) viewDidAppear:(BOOL)animated { |
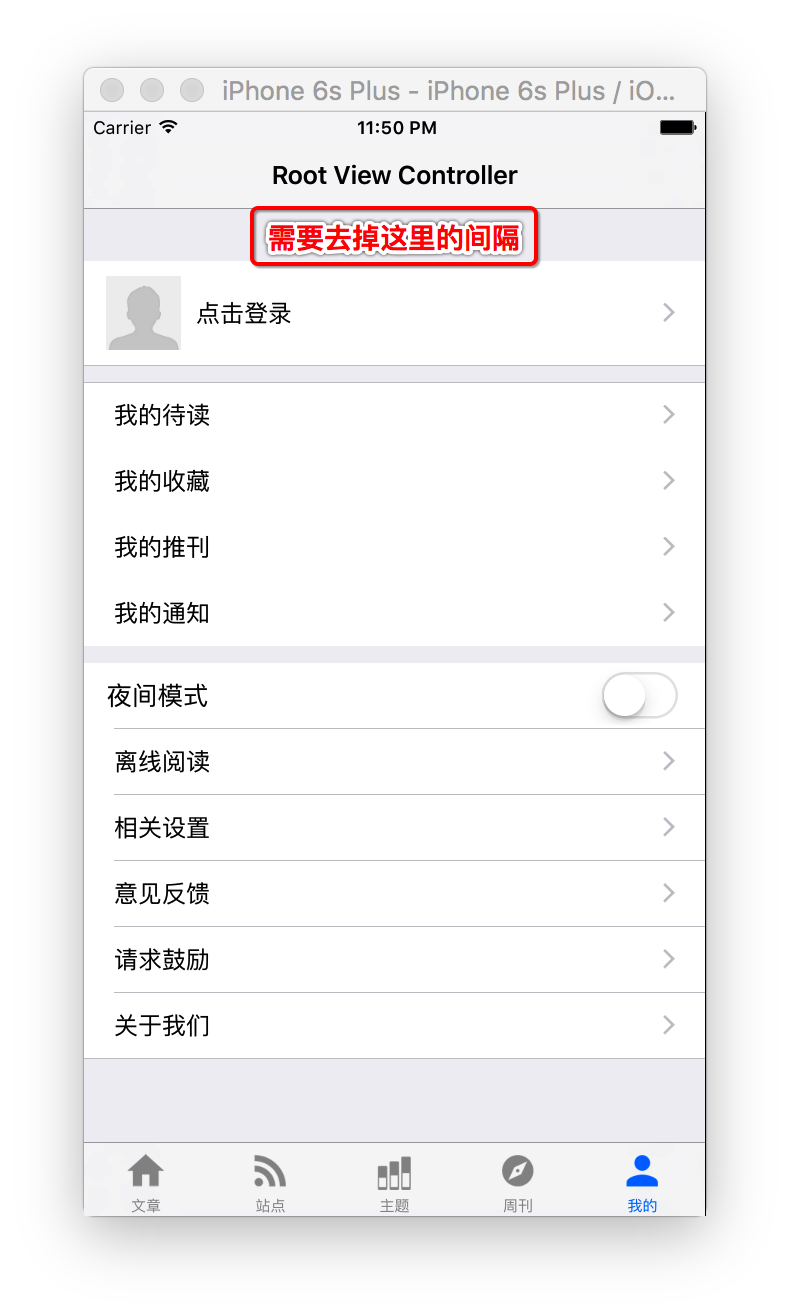
隐藏GroupedTableView上边多余的间隔
第一个 Section 距离屏幕顶端有间隔,解决这个问题有三种方式。
方式一:设置UITableViewHeader
1 | CGRect frame = CGRectMake(0, 0, 0, CGFLOAT_MIN); |
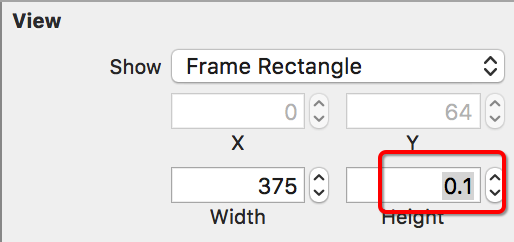
方式二:Storyboard
在第一个 Section 的上面拖进来一个空 UIView,设置view的height为0.1。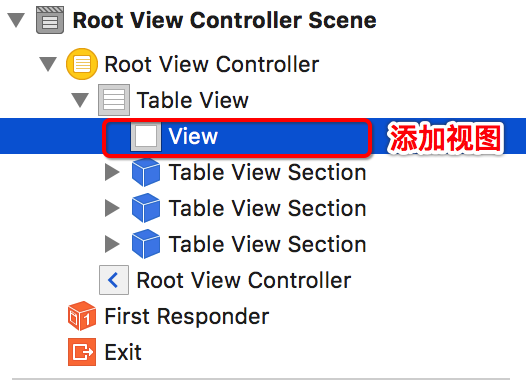
方式三:实现heightForHeaderInSection协议方法
1 | - (CGFloat) tableView:(UITableView *)tableView heightForHeaderInSection:(NSInteger)section |
UINavigationBar
自定义leftBarbuttonItem,左滑返回手势失效
1 | self.navigationItem.leftBarButtonItem = [[UIBarButtonItem alloc] initWithImage:img style:UIBarButtonItemStylePlain target:self action:@selector(onBack:)]; |
滑动隐藏NavigationBar
navigationController.hidesBarsOnSwipe = Yes
导航条返回键隐藏title
[[UIBarButtonItem appearance] setBackButtonTitlePositionAdjustment:UIOffsetMake(0, -60) forBarMetrics:UIBarMetricsDefault];
NavigationBar透明而不是带模糊的效果
1 | [self.navigationBar setBackgroundImage:[UIImage new] forBarMetrics:UIBarMetricsDefault]; |
改变导航栏里返回按钮的图标颜色
self.navigationController.navigationBar.tintColor = [UIColor whiteColor];
拉伸图片,图片不变形
UIImage *image = [[UIImage imageNamed:@"xxx"] stretchableImageWithLeftCapWidth:10 topCapHeight:10];
ScrollView莫名其妙不能在viewController划到顶
self.automaticallyAdjustsScrollViewInsets = NO;
怎么点击self.view就让键盘收起
两种方法:
1 | - (void)touchesBegan:(NSSet *)touches withEvent:(UIEvent *)event |
1 | - (BOOL)canBecomeFirstResponder { |
修改状态栏样式
在info.plist文件中添加UIViewControllerBasedStatusBarAppearance设置为NO[[UIApplication sharedApplication] setStatusBarStyle:UIStatusBarStyleLightContent];
一句话解决倒计时问题,比如获取验证码倒计时

WKWebView的使用和各种坑的解决方法(OC+Swift)
UIImageView加载WebP格式的图片
WebP格式简介:http://isux.tencent.com/introduction-of-webp.html
WebP格式图片示例:<1.sm.webp>
使用CocoaPods和SDWebImage
1 | pod 'SDWebImage' |
使用CocoaPods和YYWebImage
1 | pod 'YYWebImage' |
UINavigationController
NavigationController中跳转
比如视图控制器,A——>B——>C——>D,现在在D页面中返回时跳转到不在导航控制器栈中的F视图控制器。
1 | NSMutableArray * vcs = [NSMutableArray arrayWithArray:self.navigationController.viewControllers]; |
常用宏
尺寸宏
1 | #define StatusBar_HEIGHT 20 |
打印宏
1 | //直接替换NSLog |
系统宏
1 | // 获取版本 |
内存宏
1 | // 使用ARC和不使用ARC |
颜色宏
1 | // rgb颜色转换(16进制->10进制) |
其他宏
1 | //方正黑体简体字体定义 |
单例宏
1 | #define SYNTHESIZE_SINGLETON_FOR_CLASS(classname) \ |
第三方库
键盘遮挡
iOS动画帧速计算类库
Gif 播放
其他
版本号的命名
根据国际主流的惯例,使用「语义化版本(Semantic Versioning)」的命名方式,有时简称 SemVer。
语义化版本号(以下简称「版本号」)的格式是:<major>.<minor>.<patch> 。如:1.4.15、6.2.0。
每一位版本号的含义
- <major> 即主版本号,俗称大版本升级。改动到主版本号时,标志着 API 发生了巨大变化,包括但不限于新增特性、修改机制、删除功能, 一般不兼容上一个主版本号。
- <minor> 即次版本号,俗称小版本升级。当我们进行常规的新增或修改功能时,改动次版本号,但是 必须是向前兼容的。这也意味着我们 不能直接删除某个功能。如若必要,我们可以在 changelog 中标记某项功能为「即将删除(Deprecated)」,然后在下一个大版本中将其彻底删除。
- <patch> 即修订号,俗称 bug 修复。顾名思义,如果仅仅为了修复或调整一些小问题,我们就只改动修订号。
注意事项
- 版本号前不要加 v。
- 不要在数字前补 0。错误示例:01.12.03。
- 每一位版本号按照 +1 的速度递增,不要在版本号之间跳跃。
- 主版本号停留在 0 的版本号,即 0.x.x 应当视作还在内部开发阶段的代码。如果代码有公共 API,此时不宜对外公开。
- 1.0.0 的版本号用于界定公共 API 的形成。
- 当次版本号递增时,修订号归零;当主版本号递增时,次版本号、修订号归零。
- 进行新的开发时,版本号从 0.1.0 开始。
- 如果不小心把一个不兼容的改版当成了次版本号发行,应当发行一个新的次版本号来更正这个问题并且恢复向下兼容。注意 不能去修改已发行的版本。
一个典型的版本号发展示例
- 0.1.0
- 0.1.1
- 0.1.2
- 0.2.0
- 1.0.0
- 1.1.0
- 1.1.1
- ……